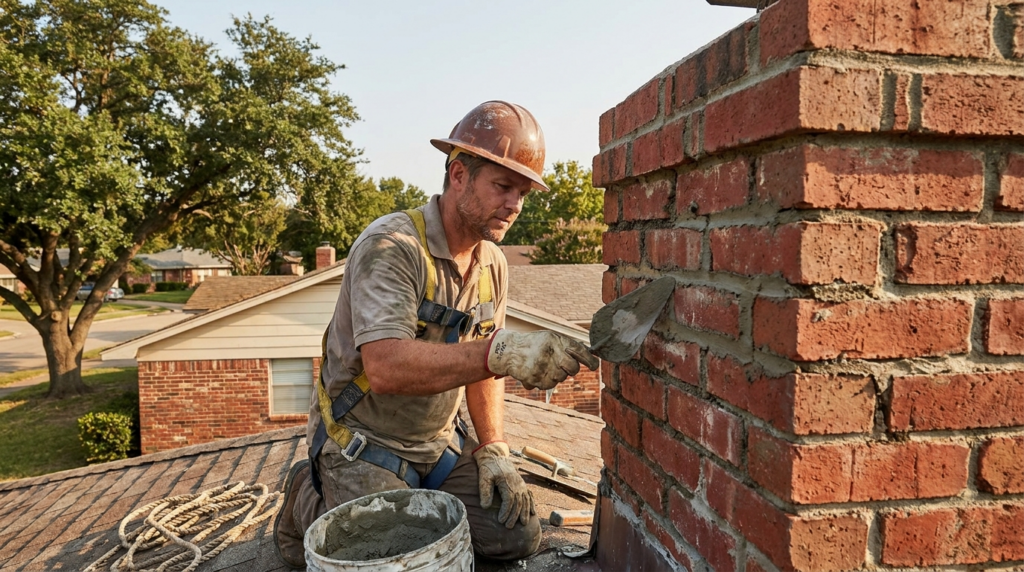
Repairing a damaged chimney crown usually involves cleaning the surface, filling cracks with repair mortar, and sealing the top with an elastomeric waterproof coating. In some cases, though, the damage goes deeper. When the crown is severely cracked or missing chunks, it may need to be rebuilt completely.
For minor cracks, the process is fairly straightforward. A wire brush removes debris and loose mortar. Larger cracks are filled with masonry repair mortar or exterior sealant, and the entire crown is coated with a flexible waterproof sealant designed specifically for chimneys. These coatings expand and contract with temperature changes, which matters more than most homeowners realize, especially in a place like Dallas where temperatures swing quite a bit through the year.
For major damage, a full rebuild becomes necessary. That means removing the deteriorated crown and pouring a new concrete crown about 3 to 4 inches thick with a proper overhang, ideally around two inches past the chimney edges. That overhang helps channel rainwater away from the brickwork and prevents long term moisture intrusion.
It sounds simple enough on paper. But chimney crowns sit at the very top of the chimney system, exposed to heat, storms, UV rays, and sudden temperature shifts. Over time, even small cracks can turn into water leaks that damage the chimney structure below.
And honestly, this is where many Dallas homeowners get caught off guard.
Understanding the Role of a Chimney Crown
Before getting into repair methods, it helps to understand what the chimney crown actually does.
A chimney crown is the concrete or mortar slab that sits on top of the chimney structure, surrounding the flue liner. Its job is surprisingly important. It acts as the first line of defense against rain, moisture, and debris entering the masonry system.
Without a properly built crown, water can seep into the brickwork. Over time that moisture causes:
Brick deterioration
Interior chimney leaks
Rusted fireplace components
Mold growth inside the chimney cavity
Freeze thaw damage during colder months
Dallas does not have the harsh winters seen in northern states, but the region still experiences sudden temperature fluctuations and heavy seasonal storms. Those cycles can slowly expand small cracks in the crown.
It is subtle at first. A hairline fracture, maybe barely noticeable.
But water always finds its way in.
Common Signs Your Chimney Crown Needs Repair
Many homeowners never look at the chimney crown. It sits high on the roof and often goes unnoticed for years.
Still, there are several warning signs that suggest crown damage may already be happening.
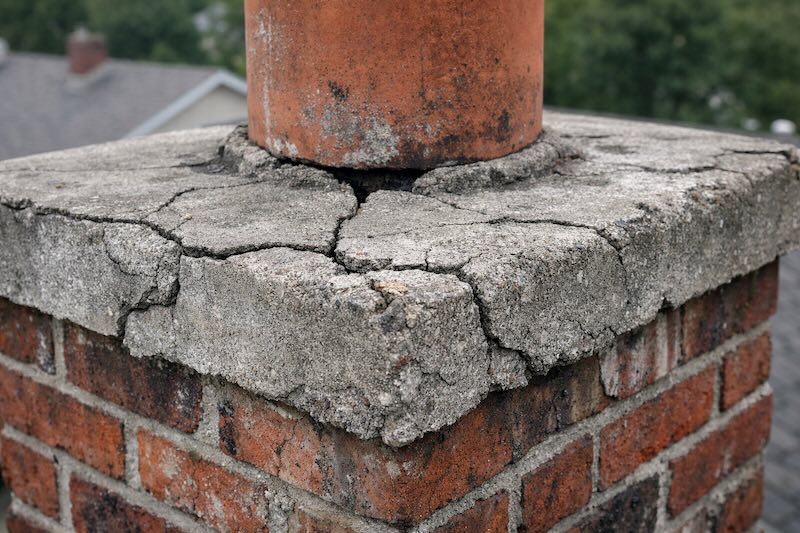
Visible Cracks in the Crown
Small hairline cracks are usually the first sign. These form from temperature expansion, aging mortar, or improper construction.
They may not look serious at first. But even thin cracks allow water penetration.
Pieces of Concrete Falling Off
If chunks of the crown are missing, the damage has progressed beyond simple surface cracking.
At that stage, moisture is likely entering the chimney structure.
Water Leaks Around the Fireplace
You might notice damp spots near the fireplace or staining along the chimney walls. Sometimes homeowners assume it is a roof leak, but it often traces back to the crown.
Rust on Fireplace Components
Moisture entering from above can cause damper assemblies and firebox components to rust.
That is a fairly common indicator during chimney inspections.
White Staining on Chimney Brick
This chalky residue is called efflorescence. It forms when water travels through brick masonry and deposits mineral salts on the surface.
It is not always caused by crown damage, but often it is part of the problem.
Why Chimney Crowns Crack in Dallas
There are several reasons chimney crowns fail, and many of them are related to how the crown was built in the first place.
Some crowns are constructed with basic mortar rather than proper concrete mixtures. Mortar alone tends to shrink and crack over time.
Other crowns lack an overhang, which means rainwater runs directly down the chimney walls.
In Dallas, intense summer heat combined with sudden thunderstorms can accelerate deterioration.
A few common causes include:
Poor original construction
Lack of waterproofing sealant
Age related cracking
Freeze thaw cycles during winter cold snaps
Tree debris or animal activity
Improper flue expansion spacing
Sometimes the crown simply reaches the end of its lifespan.
I have seen crowns that lasted 30 years without issue, and others that started cracking after just five.
It depends on materials, weather exposure, and honestly, the quality of the original workmanship.
Types of Chimney Crown Damage
Not all chimney crown damage is the same. Some situations require only minor repair, while others require a complete rebuild.
Here is a simple comparison.
| Damage Type | Severity | Typical Repair Method | Estimated Longevity |
|---|---|---|---|
| Hairline cracks | Low | Elastomeric crown sealant | 5 to 10 years |
| Surface fractures | Moderate | Mortar patch + waterproof coating | 8 to 15 years |
| Deep cracks | High | Structural repair or partial rebuild | 15 to 25 years |
| Missing crown sections | Severe | Complete crown rebuild | 25+ years |
The important thing here is recognizing damage early.
Repairing a small crack costs far less than rebuilding the entire crown.
DIY Chimney Crown Repair for Minor Cracks
For homeowners comfortable working on a roof, small crown cracks can sometimes be repaired without full reconstruction.
Still, safety matters. Roof work always carries some risk, especially on steep slopes.
If there is any hesitation, it may be better to hire a professional chimney technician.
Step 1, Clean the Crown Surface
Use a stiff wire brush to remove dirt, moss, debris, and loose mortar.
The goal is to expose solid material where the repair compound can properly bond.
Sometimes compressed air helps remove dust trapped inside small cracks.
Step 2, Widen Hairline Cracks Slightly
This may sound counterintuitive, but very thin cracks sometimes need to be widened slightly with a chisel or grinder.
That allows repair mortar or sealant to penetrate properly rather than sitting only on the surface.
Step 3, Fill Cracks With Repair Mortar
Use a high quality masonry repair mortar or exterior grade silicone sealant designed for concrete and brick.
Press the material deep into the crack to eliminate air gaps.
Smooth the surface using a trowel.
Step 4, Apply Elastomeric Crown Sealant
Once the repairs cure, the entire crown surface should be coated with a brushable elastomeric crown sealant.
Products like Chimney Rx Crown Repair are commonly used because they remain flexible after curing.
That flexibility allows the coating to expand and contract with temperature shifts.
Step 5, Seal the Flue Joint
One of the most vulnerable areas is where the flue liner meets the crown.
Apply a flexible sealant around this joint to prevent water infiltration.
Many chimney leaks actually originate from this small gap.
Tools and Materials for Crown Repair
Homeowners attempting minor repairs typically use the following tools.
Tool or Material | Purpose |
|---|---|
Wire brush | Remove debris and loose mortar |
Masonry chisel | Open cracks for repair |
Concrete repair mortar | Fill structural cracks |
Elastomeric crown sealant | Waterproof the crown |
Trowel | Smooth repair surfaces |
Safety harness or roof ladder | Roof safety |
These materials are relatively inexpensive compared to the potential cost of chimney structural repairs later.
Still, DIY repairs are not always the best solution.
Sometimes what looks like a simple crack is actually a symptom of deeper chimney damage.
When a Chimney Crown Must Be Rebuilt
There are situations where patching the crown simply will not last.
Signs a full rebuild is required include:
Large cracks running across the entire crown
Multiple sections breaking apart
Severe water leaks entering the chimney
Crown thickness under two inches
No proper overhang beyond chimney edges
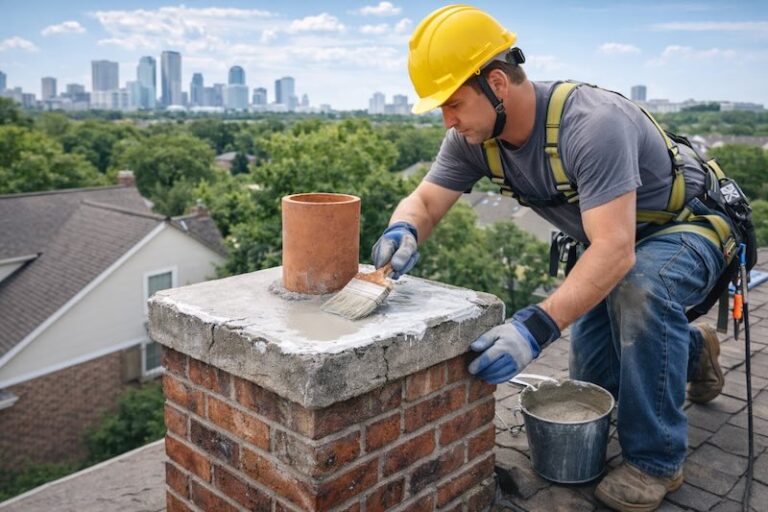
A proper chimney crown rebuild typically includes:
Removing deteriorated crown materials
Installing a form around the chimney top
Pouring new concrete 3 to 4 inches thick
Creating a slope to direct water away
Leaving expansion space around the flue liner
This process ensures long term protection against moisture infiltration.
And when done correctly, a new crown can last several decades.
Professional Chimney Crown Rebuilding Process
When chimney crown damage becomes structural, small repairs usually will not hold for long. A professional rebuild becomes the safer solution. It sounds like a major job, and in some ways it is, but experienced chimney technicians handle it fairly routinely.
The process starts with a detailed inspection. Technicians examine the crown, flue liner, brickwork, and surrounding flashing. Sometimes the visible crack in the crown is only part of the problem. Water might already be affecting the top courses of brick underneath.
Once the assessment is complete, the damaged crown must be removed.
Step 1, Removing the Old Crown
Technicians use masonry grinders and chisels to break apart the deteriorated concrete crown. This step requires care because the flue liner and top chimney bricks must remain intact.
Loose pieces are cleared away until the entire crown surface is removed.
Sometimes the chimney top reveals additional issues underneath, like deteriorated mortar joints or water damaged bricks. Those areas are usually repaired before the new crown is installed.
Step 2, Preparing the Chimney Top
Before pouring a new crown, the chimney top needs proper preparation.
Technicians install a temporary form around the chimney to shape the new crown. This frame determines the slope, thickness, and overhang of the finished crown.
Most professionals recommend a crown thickness between 3 and 4 inches, with a slight slope that directs water away from the flue opening.
The crown should extend roughly 2 inches beyond the chimney edges. That small overhang might not look important, but it helps rainwater drip away instead of running down the masonry.
Step 3, Creating Expansion Space Around the Flue
Another critical detail involves the flue liner.
Concrete crowns should never be poured directly against the clay flue tile. As the flue heats and cools, it expands slightly. If it is locked into the concrete crown, that movement can cause cracking.
Instead, professionals leave a small expansion gap around the flue liner and fill it with flexible sealant.
It is one of those details many older chimneys were built without.
Step 4, Pouring the New Crown
Once everything is ready, the technician pours the concrete crown mixture into the form.
The concrete is shaped carefully to create a sloped surface that sheds water. Some technicians also incorporate fiber reinforcement in the mix to reduce cracking over time.
After pouring, the crown must cure properly. Depending on weather conditions in Dallas, curing can take between 24 and 48 hours before full strength begins developing.
Step 5, Waterproofing the Crown
After curing, many chimney professionals apply an elastomeric waterproof crown sealant.
This protective layer helps prevent water penetration and extends the life of the new crown significantly.
It also helps bridge microscopic surface cracks that can appear over time.
Chimney Crown Repair Cost in Dallas
Cost is one of the first questions homeowners ask. Understandably.
Prices vary depending on the damage level, roof accessibility, and chimney size.
Here is a general breakdown of typical chimney crown repair costs in Dallas
| Repair Type | Typical Cost Range | Average Time Required | Best For |
|---|---|---|---|
| Crack sealing | $150 – $450 | 1–2 hours | Hairline cracks |
| Mortar patch repair | $400 – $900 | 2–4 hours | Moderate cracks |
| Crown resurfacing | $900 – $1,800 | Half day | Worn crown surface |
| Full crown rebuild | $1,800 – $4,500 | 1–2 days | Severe damage |
These numbers reflect averages across Dallas area chimney companies. Steep roofs or multi flue chimneys can increase the cost slightly.
Still, crown repair remains far cheaper than repairing major chimney structural damage later.
Chimney Crown vs Chimney Cap
This is something many homeowners confuse, which is understandable.
Both sit at the top of the chimney, but they serve different purposes.
Here is a quick comparison.
| Feature | Chimney Crown | Chimney Cap |
|---|---|---|
| Location | Concrete slab covering chimney top | Metal cover over flue opening |
| Material | Concrete or mortar | Stainless steel or copper |
| Purpose | Protect chimney structure from water | Keep animals, rain, and debris out |
| Replacement Frequency | 20–30 years | 10–20 years |
Ideally, a chimney should have both.
The crown protects the masonry structure. The chimney cap protects the flue opening.
Together they prevent most water entry issues.
Why Dallas Weather Damages Chimney Crowns Faster
Dallas weather can be surprisingly rough on chimney crowns.
The region experiences extreme summer heat, sometimes exceeding 100°F, followed by sudden thunderstorms and rapid cooling. Concrete expands during heat and contracts as temperatures drop.
That repeated cycle stresses the crown over time.
A few environmental factors contribute to crown deterioration:
Intense UV exposure
Sudden temperature swings
Heavy rainfall storms
Occasional winter freeze cycles
Wind driven debris
Even minor cracks can widen slowly under these conditions.
It might take years before noticeable damage appears. Then suddenly water begins leaking inside the chimney.
Homeowners often assume the leak started recently, but the crown damage probably began much earlier.
Preventing Future Chimney Crown Damage
Prevention tends to be simpler than repair.
A few basic maintenance steps can extend crown life significantly.
Schedule Annual Chimney Inspections
Professional inspections catch early cracks before they grow larger.
Many chimney technicians in Dallas recommend yearly inspections, especially for wood burning fireplaces.
Apply Waterproof Crown Sealant
Elastomeric crown sealants provide an extra barrier against water intrusion.
They typically last around 5 to 10 years before needing reapplication.
Install a Stainless Steel Chimney Cap
Caps prevent rainwater and animals from entering the flue opening.
They also reduce the amount of moisture that lands directly on the crown.
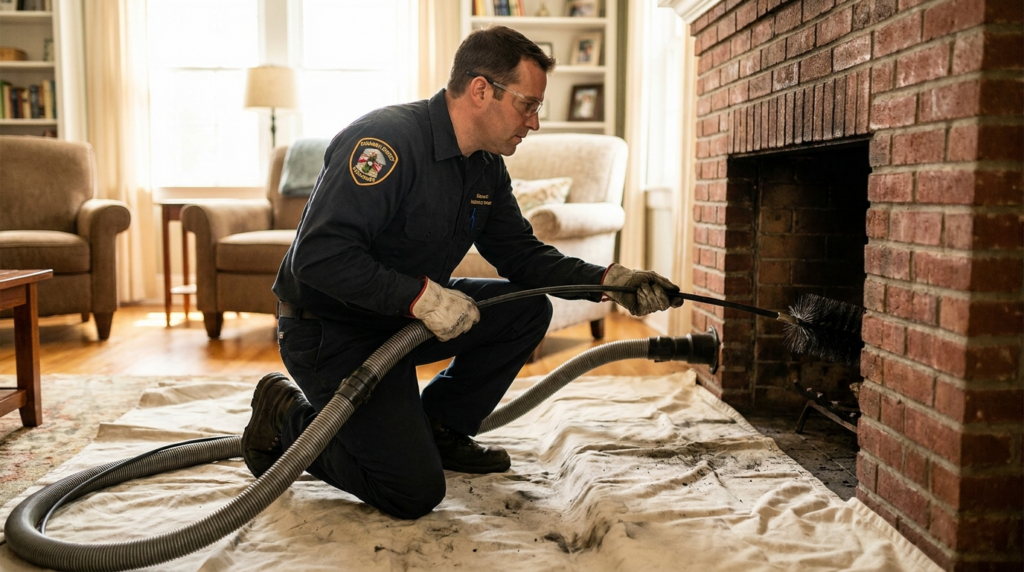
Keep the Chimney Clean
Debris buildup and animal nests can trap moisture near the crown.
Regular cleaning prevents that issue.
Address Small Cracks Quickly
Small crown cracks are inexpensive to repair.
Waiting too long allows water damage to spread deeper into the chimney structure.
Expert Tip Most Homeowners Do Not Hear
This might sound minor, but it makes a big difference.
A properly built chimney crown should always slope slightly away from the flue liner.
Flat crowns hold water.
Standing water eventually penetrates the concrete surface and expands cracks. It might take months or years, but it almost always happens eventually.
When chimney professionals rebuild crowns today, they intentionally design the surface with a slope for drainage.
Older chimneys, especially those built decades ago, often lacked that detail.
When to Call a Chimney Professional
DIY repairs can work for very small cracks. But there are situations where professional help is clearly the better option.
You should contact a chimney repair specialist if:
The crown has large structural cracks
Pieces of concrete are missing
Water leaks are visible inside the chimney
The chimney crown is crumbling or deteriorating
You are uncomfortable working on a roof
Professional chimney technicians can diagnose underlying structural issues that might not be visible from ground level.
Sometimes the crown damage is only one part of the problem.

Chimney Crown Lifespan, How Long Should It Last?
A properly constructed chimney crown should last a long time. In many cases, 20 to 30 years, sometimes even longer if the crown was built correctly and maintained periodically.
But that is the ideal scenario. Reality can be a little different.
Some crowns begin cracking after only 8 to 10 years. I have seen it happen more than once, usually when the original construction used mortar instead of proper concrete or when the crown lacked a protective overhang.
A few factors influence how long a crown lasts:
Quality of the original concrete mixture
Proper slope and overhang design
Exposure to rain and sun
Dallas heat cycles and seasonal storms
Whether waterproof sealant was applied
Installation of a chimney cap
Older chimneys built before modern crown repair products became common sometimes deteriorate faster. Not always, but often enough that chimney technicians see it regularly during inspections.
One small hairline crack might not look like much. But give it a few years of rain, heat expansion, and temperature changes, and that crack slowly grows.
Water does not rush in all at once. It creeps in gradually.
And that is usually how crown damage progresses.
Typical Chimney Crown Lifespan by Material
Different crown materials perform differently over time.
| Crown Material | Average Lifespan | Durability Level | Notes |
|---|---|---|---|
| Mortar crown | 8 to 15 years | Low | Common on older chimneys, cracks easily |
| Standard concrete crown | 20 to 30 years | High | Most modern crowns use reinforced concrete |
| Elastomeric coated crown | 30+ years | Very high | Flexible coating prevents cracking |
The elastomeric coating option has become popular in recent years. It acts almost like a waterproof membrane, expanding and contracting with temperature changes.
For Dallas chimneys, that flexibility helps quite a bit.
Chimney Crown Maintenance Checklist for Dallas Homeowners
Most chimney crown damage can actually be prevented with simple maintenance. It does not require complicated work, just periodic attention.
Here is a simple checklist homeowners can follow.
Maintenance Task | Recommended Frequency | Why It Matters |
|---|---|---|
Chimney inspection | Once per year | Identifies cracks early |
Crown waterproofing | Every 5 to 10 years | Prevents water intrusion |
Chimney cleaning | Yearly if using fireplace | Removes debris buildup |
Cap inspection | Every 2 years | Prevents animal entry |
Crack repair | As soon as detected | Stops structural damage |
These steps may seem small, but they extend the lifespan of the entire chimney system.
A chimney is exposed to more weather than almost any other part of a home. Preventative maintenance helps keep repairs manageable.
Why Chimney Crown Damage Should Never Be Ignored
Chimney crowns may appear like a minor part of the chimney, but they protect the entire structure below.
Once water enters the masonry system, it can cause several problems:
Brick deterioration
Rusted fireplace dampers
Chimney liner damage
Mold growth inside chimney cavities
Interior wall leaks near the fireplace
In extreme cases, water damage can weaken the structural integrity of the chimney stack itself.
That is why chimney professionals usually emphasize crown repairs early.
A $300 crack repair today could prevent a $5,000 chimney rebuild later.
That difference matters.
Choosing a Chimney Crown Repair Professional in Dallas
Not every contractor specializes in chimney systems. Roofing companies sometimes attempt crown repairs, but chimney technicians usually understand the structural details better.
When choosing a chimney repair professional, consider a few important factors.
Experience With Masonry Chimneys
Chimney crowns interact with brick, mortar joints, and flue liners. Experienced chimney technicians understand how these components work together.
Knowledge of Waterproofing Systems
Modern chimney repair often includes elastomeric coatings or masonry waterproofing treatments.
These products significantly extend crown life.
Proper Crown Construction Techniques
A properly built crown includes:
Concrete thickness of at least 3 inches
A slope for water runoff
A two inch overhang beyond the chimney edges
Expansion space around the flue liner
Missing any of these details can lead to premature cracking.
Local Experience
Dallas weather conditions affect masonry chimneys differently than colder climates. Local chimney specialists tend to understand these conditions better.
Frequently Asked Questions About Chimney Crown Repair
How do you repair a chimney crown?
How do I know if my chimney crown is cracked?
Can I repair a chimney crown myself?
How much does chimney crown repair cost in Dallas?
What causes chimney crowns to crack?
Should a chimney crown be waterproofed?
Final Thoughts, Protecting Your Chimney Crown in Dallas
Chimney crown damage often starts quietly.
A small crack appears on the concrete surface. Maybe it goes unnoticed for months, sometimes years. Rainwater slowly finds its way into that crack, and little by little the moisture works deeper into the chimney structure.
At first, nothing seems wrong.
Then one day, perhaps during a heavy storm, a homeowner notices a damp spot near the fireplace or a faint musty smell in the living room.
By that point the crown damage has usually been developing for quite some time.
The good news is that chimney crown repairs are often straightforward when addressed early. Sealing cracks, applying waterproof coatings, or rebuilding the crown entirely can restore the chimney’s ability to shed water effectively.
For homeowners in Dallas, periodic chimney inspections and timely repairs can extend the life of the entire chimney system for decades.
A well maintained chimney crown protects the masonry below, prevents water intrusion, and keeps the fireplace functioning safely year after year.